By Graeme Barber
If you have collected a military firearm perhaps you too will have experienced the euphoria created by admiring it, reading about it and showing it off to others who are willing to share the passion. This is very often followed (invariably soon after acquisition) by the desire to purchase accessories, tools and any other item that was used with or for its continuance in service. Most extra items are readily available and reasonably priced and can keep the interest alive before another firearm for the collection is sourced. Most collectors acquire extras such as bayonets, slings, ammo pouches, manuals, cleaning gear, armourers tools or any other accessory they manage to lay their hands on.
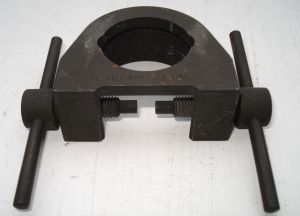
While many of the extra items were issued with the firearm as part of a soldiers fighting kit there were some that were used by armourers and intended for more specialised functions. Foresight adjusting cramps are one example of such items but little seems to have been written about them.
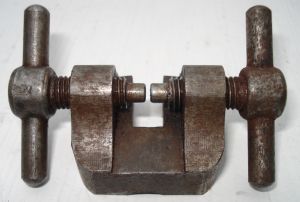
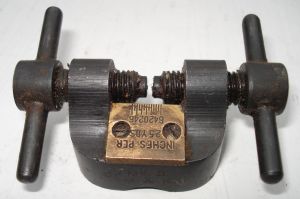
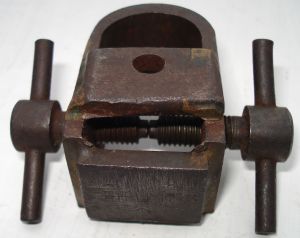
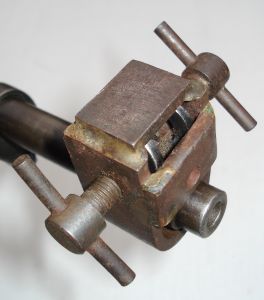
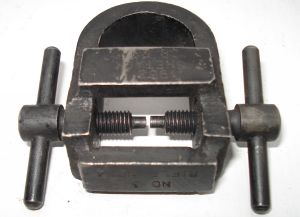
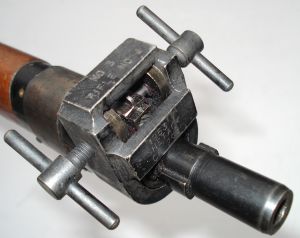
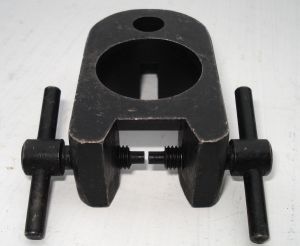
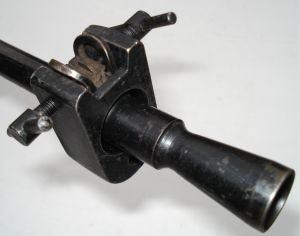
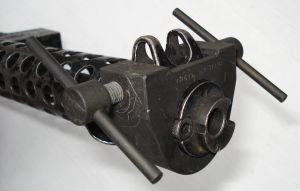
This article is about six cramps from the author’s collection. The numbering system is intriguing, as it seems to be consecutive probably based on the order of production of the firearm. The following table identifies the tool number and firearm it fits, and marks on examples in the photographs.
Tool
Manufacturing Marks
Photo No.
No1 for No1 MkIII rifles
No visible marks
a
MkII
M.& K ^ (Broad Arrow)
Scale MARKED inches per 25yds
6420246
b
No2 for P14/No3 rifles
(and also fits the P17)
RIFLE No3
^ (Broad Arrow)
c
No3 for No4 rifles
No3
Rifle No4
d
1953 ^ (Broad Arrow)
SHETACK
CR 29A
No4 for No5 rifles
No4. RIFLE. No 5.
e
No5 for the Sterling SMG
TL. F/S No5 CR. 116A
DMM 1967
f
The No1, No4 and No5 tools were milled out of a solid block of steel with the No 4 tool requiring several intricate cuts to fit around the bayonet lug on the No5 rifle. The No2 and No3 tools were fabricated from flat steel with the parts for No2 tool very crudely cut and welded together. While looking very similar tool No2 was too narrow to fit over the No4 rifles fore sight protectors ears. The No3 tool is however able to function effectively on the P14 rifle
An occasional photo and caption relating to tools No1 and No3 can be found in the informative Skennerton and Labudda publications on the Lee-Enfields and a few websites also provide photos that serve to identify some of the cramps. More precise information about these tools and how to use them is limited to military armourers pamphlets. The writer has however only been able to source to date information relating to tools No1 and No3 presumably because there were more SMLE and No 4 rifles produced than the P14, No5 and Sterling SMG. Tools No1(Marks I and II) and No3 surface from time to time in auction catalogues and on web based auction sites. Tool No2 is reasonable scarce. Tools No4 and No5 are extremely hard to find probably once again a direct correlation to production numbers of the firearms.
The cramps were essentially designed and manufactured to facilitate the exchange of a foresight blade. The front of the foresight block was centre punch mark to provide a reference point (zero mark) for the new blade before the old blade was removed. T bar screws on the cramp were wound out far enough to enable the fore sight blade to lie between the screws. The screws were tightened until the foresight blade was gripped gently then one screw was unscrewed and the other tightened alternately until the foresight blade was removed without damaging the dovetailed foresight block. The replacement foresight blade was correctly positioned back to the zero position using the T bar screws to push and guide it back in to place. Once the foresight blade was correctly located it was centre punched to lock it in place. The early and first variation of the No4 rifle foresight block was fitted with a foresight blade screw that negated the need for the blade to be secured with a centre punch.
The No1 tool by its design necessitated the removal of the SMLE nose cap in order to slip over the foresight block (refer photo b). The nose cap was replaced once the new blade was correctly positioned. If adjustment or replacement of the foresight blade was required after any test firing the nose cap needed to be removed once again. The design of tools No’s 2-5 were improved significantly as they fitted over the foresight protector and could remain in place after a foresight blade was replaced and during any test firing and subsequent adjustment.
Some tools can be found without military marks suggesting that the trade produced and sold cramps to the serious target shooter as well to be used to improve the accuracy of the many sold out of service firearms that saw extensive use within the target shooting fraternity long after their service life had finished.
Most armourers however reported that they rarely if ever used an adjusting cramp instead finding a hammer and drift much quicker and more efficient to the deft touch of a soldier trained in the art of keeping firearms functional and accurate for the front line soldier.
a) Tool No1 Mark I for SMLE rifles (Authors collection)
b) Tool No1 Mark II fitted to a SMLE rifle (Authors collection)
c) Tool No2 fitted to a P14 (No 3) rifle (Authors collection)
d) Tool No3 fitted to a No4 rifle (Authors collection)
e) Tool No4 fitted to a No5 jungle carbine (Authors collection)
f) Tool No5 fitted to a Sterling SMG (Authors collection)
References
Skennerton I.D., The Lee Enfield A century of Lee-Metford & Lee-Enfield Rifles & Carbines, Skennerton Publications, 2007.
Labudda B. & Skennerton I.D., Accurizing & Shooting Lee-Enfields, Skennerton Publications, 2005.
Small Arms Part 3 Instructions for Dismantling, Assembling, Testing, Adjusting, Lubricating, Maintenance, and Repair, A.P.1641P, Air Ministry 1943.
